Google Play Store APK Download 44.6.25 for Android
Google Play Store gives android users safe access to a wide selection of apps, games, music, movies, and more. However, some devices don’t have Google Play Store by default.
Or maybe it is pre-installed on your smartphone or tablet, but you want to update or revert to your previous version. In either case, you may need to download the Google Play APK file from a third-party app store or tech website.
In this post, you will learn:
- How to download and install Google Store APK on your Android device
- How to download and install Google Play APK on an Amazon Fire tablet
- How to check a Play Store APK download file to ensure it’s safe before installing
Let’s get started.
How to download and install Google Store on your Android device
Google Play Store usually gets updated automatically. However, the upgrades and improvements don’t take effect as soon as they are rolled out. You may have to wait for several weeks before the updates arrive.
If you’re not patient enough — perhaps because your device isn’t running smoothly and you suspect your current Play Store might be to blame — you’ll want to install the latest Google Play ASAP, manually.
If you opt for a manual upgrade, first make sure to check the version of Google Store running on your device. Well, here’s how to go about it.

- Go to the settings app. Pull down the notification bar on your device, and then tap the gear icon.
- Select the ”Apps & Notifications” option. In some devices, it is ”Apps” or ”App Management.”
- Tap ”See all apps.” That’s if you don’t see a list of all the apps.
- Navigate to Google Play Store and tap.
- Scroll to the bottom of the app details. You may need to select ” Advanced” on some smartphones. You’ll see the current version number on your device.
If your device doesn’t come with Google Play pre-installed, you’ll have to search for the version with the most recent date. Make sure it is compatible with your phone.
With that being said, let’s now explain how you can download and install a Play Store APK.
1. Choose a safe APK site
Since a Play Store APK package installs the app on your system, it’s imperative to understand the risks involved.
Cybercrooks or cyberspies can take advantage of the moment to modify the APK file, and you could end up installing malware or virus on your device. That’s why it’s highly advisable to use a reliable source for your Google Play Store download or any other APK files.
A third-party app platform like DivxLand is widely trusted for safe downloads. It is well-known to thoroughly vet the APK files uploaded to the site.
But keep in mind, though, even when downloading from a trusted site, your web browser will display the warning ”This type of file can harm your device. Do you want to keep… anyway?”
There’s no need to get concerned. Just accept the file download.
2. Enable unknown sources
To install an app you’ve downloaded outside of the official Google Play Store, you must enable the ”Unknown Sources” setting. Google labels apps unknown because they haven’t undergone its vetting process to verify they meet the minimum requirements.
But with your approval, apps from other sources can run on your device.
Keep in mind, though, the way it works has changed. Before Android Oreo, it was a system setting. That changed to per-app permission after Android Oreo.
To allow Unknown Sources in older Android version (before Oreo), you will:
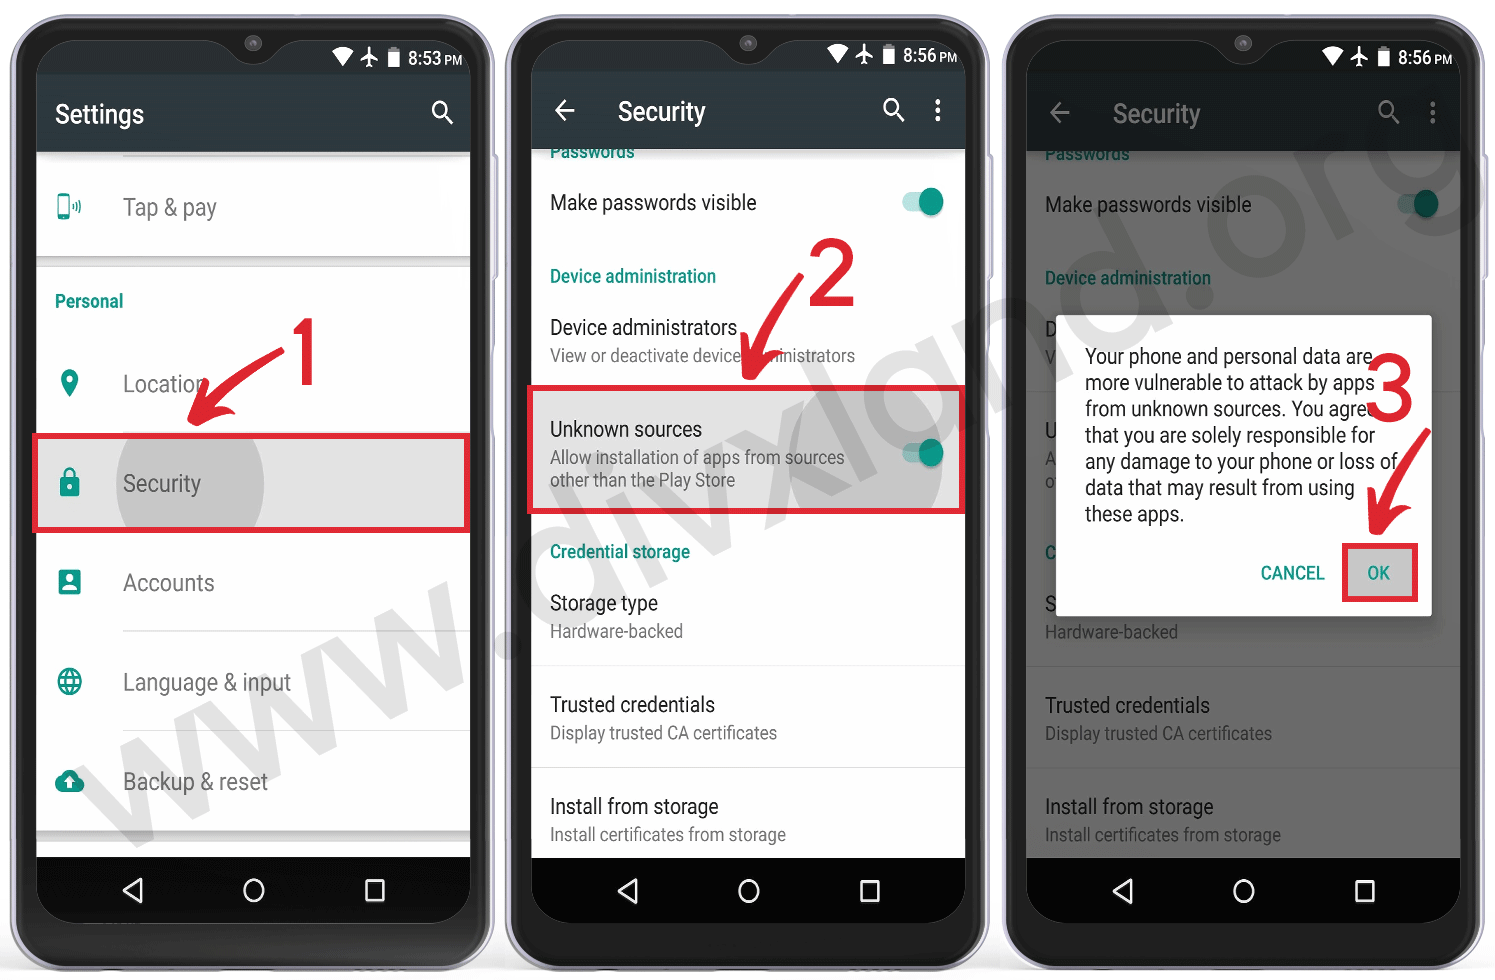
- Navigate to settings.
- Tap the ” Security” option.
- Enable the ”Unknown Sources” option.
Some devices have this feature in the Apps settings or Privacy settings. If you can’t find it, then it means your device runs Android Oreo.
In this case, you will:
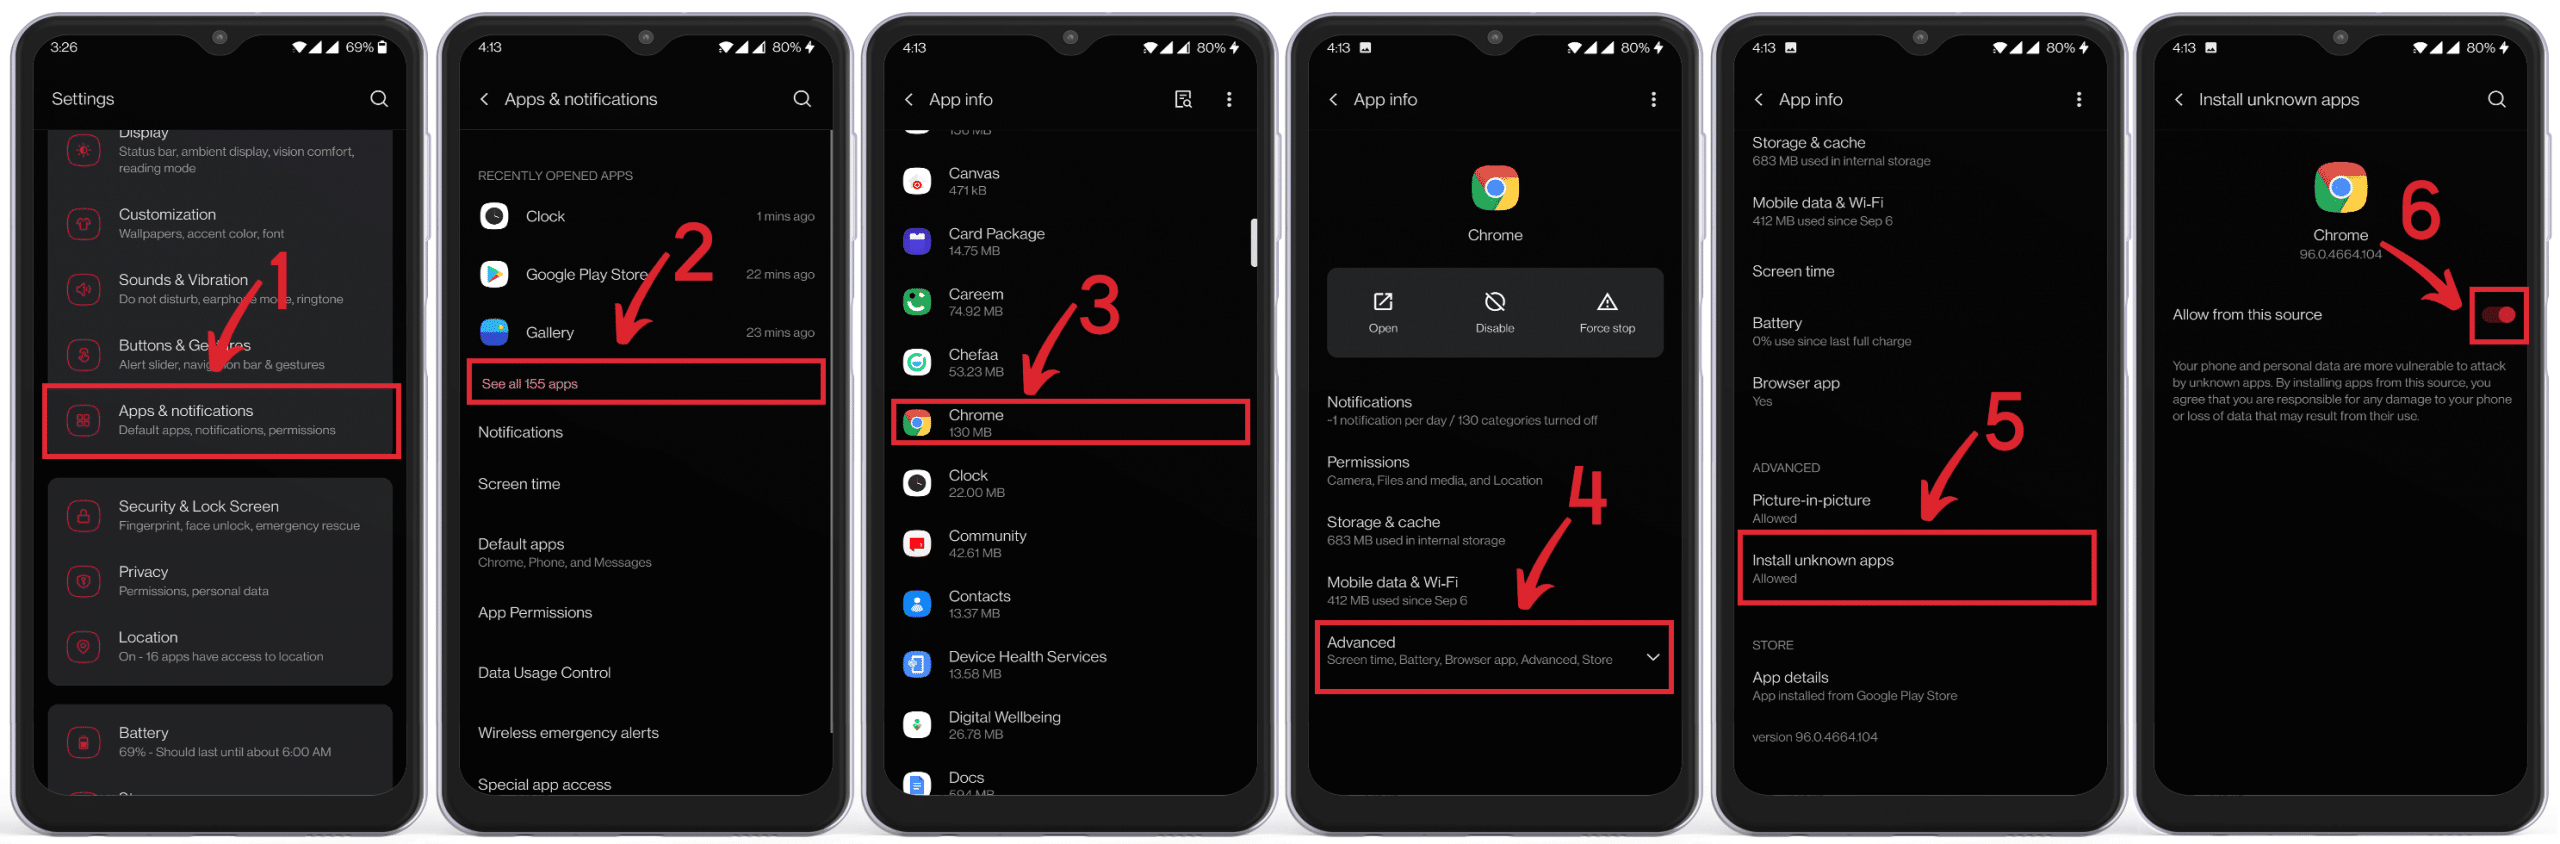
- Go to the setting app.
- Tap the ”Apps & Notifications” option.
- Find the Google Chrome browser, and tap on it.
- Under the Advanced section, you’ll see the ”Install Unknown Apps” option. Tap and select ”Allow from this source.”
Alternatively, after the Google play download step, you can commence installation directly from your web browser. Open the Downloads history, and tap on the APK file.
A warning will pop up, telling you the Google Play APK file you’re about to install doesn’t have permission. In that window prompt, toggle the switch to the on position to grant installation permission. Then, return to the installation procedure.
3. Installing Google Store APK using the file manager
- Head to the file manager app and open the downloads folder.
- Find the Play Store APK file.
- Tap to launch the installation process. Accept permissions (if any) and then click install.
A message will pop on the screen notifying you that the application has been successfully installed. Once you have installed the Google Play Store APK, you can delete the downloaded file to free up your phone storage. The app will still work properly.
Another thing worth mentioning is that don’t forget to disable the ”Unknown Sources” setting.
If you’re using an Amazon Kindle Fire device, you’ll need a completely different approach to installing Google Play Store. And that brings us to the next section.
How to download and install Google Play APK on an Amazon tablet
As an Amazon Fire tablet user, you can download apps directly from Amazon Appstore. However, you’re likely to have a problem with the limited number of apps available.
The good news is that your tablet runs on Fire OS. Well, Fire OS is essentially a modified version of Android. As such, Amazon tablet users can get access to what Google Play Store offers.
Installing Google Store APK on Amazon Fire tablets is a little complicated. You’ll need to download four APK files and launch them in a specific order.
Preparation for Google Play Download on Amazon Fire tablets
1.Before anything else, it’s advisable to remove your external SD card from the tablet if present. You don’t want the Play Store application stored on your SD card instead of the internal storage.
2. Ensure the tablet is updated. To do this, navigate to the settings app and tap ”Device Options.”
Slide down to see the ”System Updates” section. Click on it, and if not up-to-date, tap ”Check Now” for automatic updates.
3. It is equally imperative you check the model and generation of your device to download the compatible version of Fire OS. That information is available under ”Device Options.” Your device must be running Fire OS 5 or later.
4. Like Google, Fire OS restricts installations of third-party apps unless you authorize it. You can give permission by enabling the ”Apps from Unknown Sources.” On the main setting menu, locate the ”Security & Privacy” option. Under Advanced, toggle the switch to the on position.
Now let’s explain the Play Store download and installation process.
Downloading the APK files
As we mentioned earlier, installing Play Store requires four files. They are:
- Google Account Manager file
- Google Services Framework file
- Google Play Services file
- Google Play Store file
You will need to download the 64-bit versions or 32-bit versions, depending on the version of the Fire OS your device is running.
- Fire OS 6 or later requires 64-bit APK files
- Fire OS 5 or earlier requires 32-bit APK files
Of course, you’ll be downloading the files from a third-party site or tech blog. Therefore, we can’t emphasize enough the need to choose a trusted APK source.
You will download the four files, one by one — through your Amazon Silk Browser on your device.
Here’s how to download the APK files.
- Visit our preferred APK site.
- Search your device’s latest Fire OS.
- Copy and paste the link into the Silk Browser.
Tech blogs or forums may make things a lot easier for you, providing quick links to appropriate and updated versions for your tablet.
Note: Don’t begin installation until you have downloaded all files.
Google Account Manager for Various Device Models
Fire HD 10 (9th & 11 Gen) – Google Account Manager APK 7. 1. 2 Here
Fire 7 (9th Gen) – Google Account Manager APK 7. 1. 2 Here
Fire HD 8 (8th & 10 Gen) – Google Account Manager APK 7. 1. 2 Here
Fire HD 10 (7th Gen and older) – Google Account Manager APK 5. 1 Here
Fire HD 8 (7th Gen and older)- Google Account Manager APK 5. 1 Here
Fire 7 (7th Gen and older) – Google Account Manager APK 5. 1 Here
Fire HD 6 – Google Account Manager APK 5. 1 Here
Fire HDX 8.9 – Google Account Manager APK 5. 1 Here
Google Services Framework for Various Device Models
Fire HD 10 (9th Gen & 11th Gen) – Google Services Framework v9-4832352 Here
Fire HD 8 (10th gen) – Google Services Framework v9-4832352 Here
Fire 7 (9th Gen) on Fire OS 7 – Google Services Framework v9-4832352 Here
Fire HD 8 (8th Gen) on Fire OS 7 – Google Services Framework v9-4832352 Here
Fire 7 (9th Gen) on Fire OS 6 – Google Services Framework v7.1.2. Here
Fire HD 8 (8th Gen) on Fire OS 6 – Google Services Framework v7.1.2. Here
Fire HD 10 (7th Gen and older) – Google Services Framework v5.1 Here
Fire HD 8 (7th Gen and older) – Google Services Framework v5.1 Here
Fire 7 (7th Gen and older) – Google Services Framework v5.1 Here
Fire HD 6 – Google Services Framework v5.1 Here
Fire HDX 8.9 – Google Services Framework v5.1 Here
Google Play Services for Various Device Models
Fire HD 10 (9th Gen & 11th Gen) – 64-bit ARM, nodpi, Android 9.0+ Here
Fire HD 8 (10th Gen) – 64-bit ARM, nodpi, Android 9.0+ Here
Fire 7 (9th Gen) – 32-bit ARM, nodpi, Android 6.0+ Here
Fire HD 8 (8th Gen) – 64-bit ARM, nodpi, Android 6.0+ Here
Fire HD 10 (7th Gen and older) – 32-bit ARM, nodpi, Android 5.0+ Here
Fire HD 8 (7th Gen and older) – 32-bit ARM, nodpi, Android 5.0+ Here
Fire 7 (7th Gen and older) – 32-bit ARM, nodpi, Android 5.0+ Here
Fire HD 6 – 32-bit ARM, nodpi, Android 5.0+ Here
Fire HDX 8.9 – 32-bit ARM, nodpi, Android 5.0+ Here
Google Play Store
The Google Play APK file is the same. It doesn’t matter the version of Fire OS in question.
Installing the APK files on Amazon fire tablets
Step 1: Locate the ”Files” app on your device. Tap on the icon and select ”Download” to access the four APK files.
Step 2: Tap the com.google.android.gsf.login file to launchGoogle Account Manager.
Step 3: Tap thecom.google.android.gsf file to install Google Services Framework.
Step 4: Tap the com.google.android.gms to install Google Play Services.
Step 5: Tap the com.google.android.vending to install Google Play Store. Be aware that this and the previous step might take a while. So, be a little patient.
Step 6: After a successful installation of the APK files, restart your tablet. A Google Play Store icon should appear on your screen.
How to check a Play Store APK download file to ensure it’s safe
Even when you believe you’re downloading a Google Play APK or other APK files from a trusted source, it wouldn’t hurt to run a few checks for added safety.
Fortunately, verifying the authenticity of the files is easy.
Here are two options worth your consideration:
1) Upload your Google play download file to VirusTotal: Acquired by Google in 2012, VirusTotal is a free online scanning tool that can analyze any suspicious APK files to detect malware or viruses. The scanner also allows you to analyze files using URLs and more. Simply copy-paste the URLs into the ViruToral Search.
2) Scan files with MetaDefender: MetaDefender uses over 30 Antivirus engines to analyze the APK files you upload to the site. Like VirusTotal, MetaDefender can scan URLs, IP addresses, domain, or file hash. They essentially work similarly. However, this scanner is faster than VirusTotal.
There you have it! As you can see, sideloading third-party apps on your devices is not really that complicated. We hope you enjoyed reading our Google Play Store download and installation guide. Feel free to leave your comments or share the information with any of your friends struggling with sideloading Google Play onto their smartphone or tablet.